
Typically, the GameCube is a console for video game developed by Nintendo some time back in 2001. This particular six-generation gaming console replaced the Nintendo 64, and sparked some stiff competition with Sony Computer Entertainment’s PlayStation two and perhaps the Microsoft’s Xbox. It is imperative to note that the GameCube was the first gaming console to utilize optical discs as its primary medium of storage.
The GameCube promotes online gaming and equally boasts of a substantial collection of games, incredible graphics as well as unmatched reliability. In fact, these impressive features resulted in Nintendo selling more than 21.74 million GameCube units before its production ceased in 2007.
Its immediate successor, the Wii, came into existence in 2006 and is compatible with most GameCube software. The question then is how to use Gamecube controller on PC so that you can continue to play Nintendo’s amazing collection of games on PC?
Any ardent fan of video gaming will tell you that video game consoles have come a long way. Since their evolution, each generation of these consoles often come with some notable improvements on the last version, boasting of reasonably faster chips, larger storage capacities as well as incredible other features.
With fairly more robust chips, today’s gaming consoles are powerful enough to run expansive games with top-notch graphics. Apart from great games, the most excellent gaming consoles have unique accessories that extend their relevance. There are lots of gaming consoles ruling the market today, and you can always find the one that suits your gaming needs.
However, most video gamers still use Nintendo GameCube system as well as its games. Because the GameCube is not being produced anymore, it can somehow prove difficult and expensive to purchase one. This is the main reason why many individuals opt to use GameCube emulators such as Dolphin to play the console on computers. In fact, many gamers believe that connecting the controller to a PC can make your gaming experience much better. However, the question is, how do you connect the GameCube controller to your PC?
How to Use GameCube Controller on PC
With some basic computer knowledge at your disposal, connecting the GameCube controller doesn’t have to be a hard task. You’ll only need to have the ideal equipment and follow the steps we are giving you below.
Step one: Install the GameCube Emulator on your computer
First and foremost, you’ll have to install an emulator such as the Dolphin emulator and make sure that the games can both be supported and played on your desktop or laptop. If you were not aware, an emulator acts as the GameCube’s hardware by copying both data and code for gaming on your computer. Again, you must ensure that whichever emulator you are using is specifically designed to support your PC’s operating system. Thanks to technological advancements, the latest emulators offer enhanced game resolution and other great features.
Step two: Acquire the ideal equipment to connect GameCube Controllers to your PC
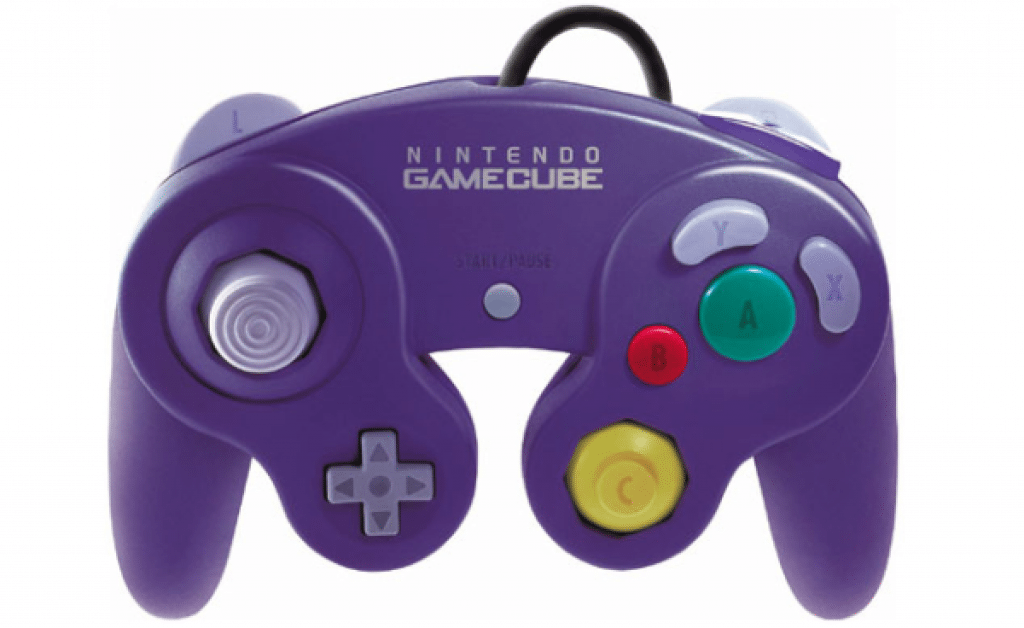
For any computer to detect the GameCube controller, some essential types of appliances must be available. Apparently, you’ll need one or more GameCube controllers. It is highly recommended that you should only use controllers manufactured by Nintendo. This is because they will not only create a successful connection with the PC, but are also known to offer unrivaled reliability.
What’s more, controllers made by Nintendo are relatively more responsive and equally features secure buttons, specifically the C-stick and the D-pad. You’ll also need a GameCube to USB adapter, such as the three-in-one Magic Joy Box from Mayflash, which will make it virtually possible for you to plug the controller into your computer.
This particular USB adapter comes with a disk to install the gamepad driver. Thankfully, a significant number of adapters have two ports, and this encourages a two-player play. Of course, by using two adapters, a four-player game is possible.
Step Three: Plug the GameCube controller into your computer
The next step will involve plugging in your USB adapter into the USB port of your PC. Although it will start functioning, the controls will not be adequately or properly configured to support the games.
Before you set the controls, you’ll have to install the gamepad driver through the disk provided. Equally, you can choose to download the software from the official website of the manufacturer. I highly recommend that you download the software since this is the only way you can access the most updated version.
Step Four: The configuration of the GameCube Controller on your PC
After the installation process, locate the game controllers on your computer’s operating system and select the USB Game Pad. Bearing in mind that the controls will not be correct as required, you’ll need to calibrate them appropriately for you to play the games.
Navigate to the calibration function and click default for both the left and right axis. Next, move your mouse around the box to the left as well as the right shaft and your analog stick will be calibrated. Next, select OK. Next, open up the emulator in operation and go to the GameCube pad configuration.
For each particular function, customize functions for the trigger, for instance, D-pad, C-stick, A, B, E and so on. You can now begin playing your favorite game. It is imperative to note that you may have to set the controls manually for every game before they can be mastered by the emulator.
As you may have seen, these procedures are straightforward. You’ll only need to purchase all the required essential equipment, connect the GameCube to your PC and enjoy playing!