
Quick Answer
Windows Modules Installer Worker is a Windows Update Service which finds and installs new Windows updates on your computer. The way this works is that it automatically keeps checking for new updates and installing them without notifying you. Although this may seem like a good thing, it can get to consume more resources in the form of CPU and even RAM than you can sometimes not afford.
It doesn’t matter the Windows version that you are making use of, it is always very important that you have the Windows up-to-date. However, the manner in which Windows gets updated can lead to a problem or more. That is the issue that some users of Windows 8.1 and Windows 10 get to face as a result of the Windows Modules Installer worker (WMIW).
Although the system process enables automatic installation as well as modification or even removal of Windows updates and other components, something that you need for the security and better functioning of your computer, it may sometimes get things out of control leading to the freezing or slowing down of your computer. This is mostly so because of the amount of CPU that it takes to function.
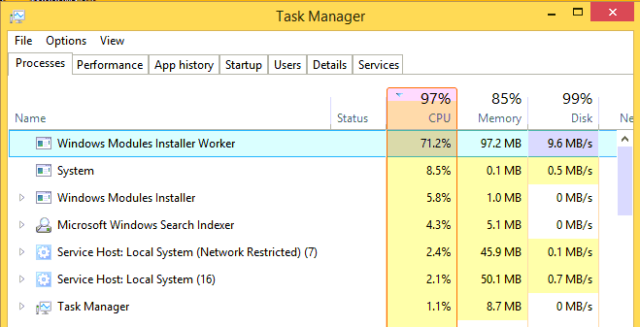
When your computer is very slow or it hangs a lot or you are even experiencing the Blue Screen of Death (BSoD), what you will want to do is to check the task manager to see if there is any service that is causing the problem. You can go to the Task Manager by simultaneously clicking on the Ctrl + Alt + Delete and then select Task Manager.
If the problem is caused by the Windows Modules Installer Worker, you will see that it is taking as much as 50% of your CPU or even more. More so, you will see that it is also taking up too much memory.
How To Stop The Windows Modules Installer Worker
There are many issues you will experience with your computer that all you need to do in other to fix it is to restart the system. With the Windows Modules Installer Worker issue, however, restarting may not help. Here are some easy ways, however, that you can fix the issue:
1. Manual Updating
Since as stated, one of the main things that cause this problem is that your system keeps updating automatically, you may as well solve it by changing your update settings from automatic to manual. Here are the steps to take:
- Open your Run dialog box by holding down the Windows key and then press R key (Windows + R Key).
- In the dialogue box, type in “services.msc” and then hit on enter.
- A Service window will open. Look for “Windows Modules Installer” and double-click on it.
- Under the General Tab, select Manual and then click on Apply and then OK.
- The next thing you want to do is to look for Windows Update in the service and double-click on it.
- Under the General tab again, change the Startup type to manual and then click on Apply followed by Ok.
- Restart your computer and go to your task manager to see if the problem is still there.
The issue that you will have with setting your computer at manual is the inconvenience of having to always go back periodically to be updating your Windows.
2. Use Metered Connection
This method is another one that you may find very convenient and easy. All you need to do is to set your connection in such a way that the updates cannot be downloaded and installed automatically. To do this, you will only need to limit data access. Here are the steps:
If you are using Ethernet-
- The first thing you want to do is to launch open your Registry by clicking in the start menu and then type in “regedit”
- Right click on it in the result and select Run as Administrator.
- Give your permission for it to run and it will open.
- You will need to navigate to this path- HKEY_LOCAL_MACHINE > SOFTWARE > Microsoft > Windows NT > CurrentVersion > NetworkList > DefaultMediaCost (If you paste the path in the address bar and it doesn’t open, you can open each from one to the next).
- Right-click on DefaultMediaCost and then click on Permissions.
- Click on Advanced in the dialog box.
- In the Advanced Security Settings box, click on Change which you will find beside TrustedInstaller.
- Under Enter the object name to select, put in the administrators and then click on Check Names. Now click on OK.
- You will want to check the Replace owner on subcontainers and objects box
Click Apply and then OK - Back to the Permissions for DefaultMediaCost windows, select Administrators
- Check the Allow box under Full Control and then click on Apply and Ok.
- Back to the main Registry Editor, double-click on Ethernet and change the Value from 1 (which means non-metered) to 2 (Metered).
- Click on Apply, then Ok, and restart your computer.
If you are using WiFi
The process for setting the metered connection for WiFi users is rather straightforward:
- At the lower right side of your computer, click on the Wifi sign and then select the network you are connected to.
- Click on Properties.
- This will open up the Settings. Look for Set as Metered Connection and turn it on.
- Close the settings and you are good to go.
3. Removing SoftwareDistribution Folder
Your installer may be consuming too many resources because it has downloaded a corrupted file which is still in the SoftwareDistribution Folder. This is where the downloaded files are stored before installation. If the file is corrupt, it will remain there and cause different problems so you will want to refresh the Windows update by deleting the folder.
- Before deleting the program, open your Run command by Pressing Windows + R and then type in services.msc to open services.
Look for Windows Update. Right click on it and select Stop. It is only after stopping this that you can delete the “SoftwareDistribution” folder. - With that done, open “My Computer” or “This PC” on your computer
- The next thing to do is to open the Local Disk (C:)
- Look for the files there and locate SoftwareDistribution. Right-click on the folder and click on delete.
- Now restart your computer and start back the Windows Update.
See Also: What is FRAPS? How To Download And Use It For Screen Recording
Other Questions On The Windows Modules Installer Worker
Can I stop Windows Modules Installer Worker?
Although it is not advisable for you to stop the Windows Modules Installer Worker, if it causes your computer to slow down or freeze as a result of taking over your processor, there is nothing that stops you from turning it off. However, you may need to always check the updates manually.
Is TiWorker exe a virus?
Also known as the Windows Module Installer Worker, TiWorker exe, the service is not a virus. It is a system process that is related to Windows update.